Coronavirus and a new normal
COVID 19 has changed our lives in countless ways. One of the main requirements has been to wear a face mask, not just for our own safety but to protect other people as well. While the N95 mask is the best choice, most people don’t have that available so we have to come up with alternatives. Making our own masks is one option available to some of us.
As a result, a new hobby has emerged – making face masks. My housemate, Ellen and I began doing this in March, 2020 and our designs have evolved as we discarded what didn’t work and built on what we liked. We’ve given masks to family members and friends. The masks have found their way around our state of Oregon and to California, Colorado, and New York.
Here I’m wearing my favorite design. It’s made out of cotton and has a layer of interfacing, it has three folds, a nose wire, and cloth ties. I like it because it’s easy to wash with soap and water after wearing outside, it’s relatively comfortable and easy to breathe, and the ties allow for fitting to minimize the side gaps.


The instructions follow in case you would like to make this yourself or send to someone else. I also have a YouTube video with demonstrations for each step. Click the link:
Instructions for making a face mask
Description
There are two versions of this face mask: one with fusible interfacing and the other with an opening so a non-woven item could be inserted such as a coffee filter or paper towel. Both versions have a wire nose piece, three folds, and cloth ties. They can be made using hand sewing but are easier and sturdier using a sewing machine. Choose fabric that will stand up to multiple wash and dry cycles.


Materials
- Cotton fabric (after wash and dry – 16” x 7 ½” per mask)
- Fusible interfacing for light to medium fabric (8” x 7 ½” per mask)
- Muslin for ties (after wash and dry – 2 strips 1 ½” by 35-36” per mask)
- Wire 26 gage (8” piece per mask)
Tools
- Sewing machine
- Thread
- Pins
- Pen and white pencil (for dark fabric)
- Scissors (for fabric)
- Wire cutter (jewelry cutter is fine)
- Ruler and yardstick or tape measure
- Iron
Steps for the mask
- Wash fabric and muslin in hot water, dry in hot dryer, and iron flat before cutting.
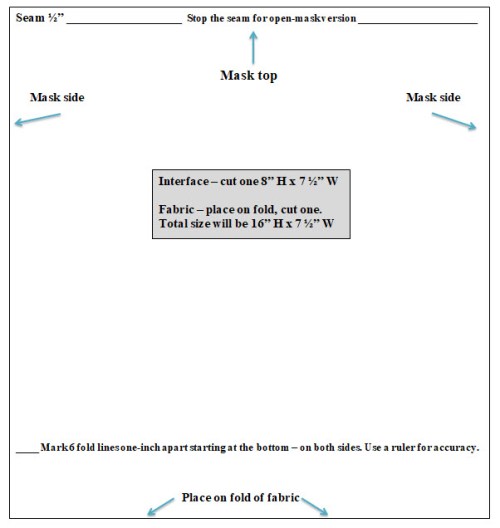
- Cut out paper template: 8” x 7 ½” (see below).
- Make the wire nose piece (see instructions below)
- Cut out the fabric (place template on the fold – cut piece should be 7 ½” wide and 16” long) and one interfacing piece (8” x 7 ½”).
- For the version using interfacing, iron on fusible interfacing to the wrong side of half the fabric piece following the instructions on the package.
- Sew top seam using ½” seam allowance. Sew all the way across for the interface version. Leave a two-inch opening in the middle of the seam for the open version.
- Turn right side out and press. Press open version with seam ½ inch lower than top of the mask so there’s room for the nose wire at the top with the opening below it. The side with the opening will be toward your face so pay attention to your fabric pattern.
- Mark the fold lines on the right sides using a pen or white pencil. Draw six marks one inch apart starting at the bottom of the mask.
- Insert the nose wire piece inside the top of the mask, center, and pin in place.
- Fold up from the first bottom mark to the second mark, the third mark to the fourth, the fifth mark to the sixth. Iron and pin in place.
- Cut two tie pieces 1 ½” x 35-36” (selvage to selvage if possible). Fold over half lengthwise and iron, then iron both sides into the middle without overlap. Iron and pin to keep the ties closed.
- Position a tie over one of the mask sides so the middle point of the tie is on the mid-point of the mask. Reposition the pins so they hold the tie and folds in place. Do the same with the tie on the other side of the mask.
- Sew the ties in place and knot each end.
- Sew around and close to the wire nose piece.
- Insert a non-woven item into the opening in the open mask version or leave as is.
Steps for the wire nose piece
- Cut a piece of 26 gage wire 8 inches.
- Fold one end over to less than half.
- Twist the wire and leave a small loop at the folded end.
- Fold the other end over so it slightly overlaps the first folded end.
- Twist the wire and leave a small loop at the end.
- Bend the wire so the overlapped ends are as smooth as possible.
Template for the mask
Here’s what your template should look like. Note the measurements.